반응형

Ubuntu 50

The request contained an unknown or invalid Host header. If you are trying to access GSA via its hostname or a proxy, make sure GSA is set up to allow it. docker

docker 로 웹서비스를 할때 위와 같이 보안때문에 접속이 안된다. The request contained an unknown or invalid Host header. If you are trying to access GSA via its hostname or a proxy, make sure GSA is set up to allow it. openvas docker 로 구동하는데 위와 같이 에러가 발생을 했다. 해결 방법은 docker openvas 로 들어가서 설정을 추가 해주면 된다. 그리고 apt-get install vi 설치 해주고 설치 안되면 apt-get update 먼저 해주면 설치가 된다. # vi /etc/default/openvas-gsa ALLOW_HEADER_HOST=허용할I..

Ubuntu 2023.11.01

ubuntu 하드용량 조절하기 gparted

ubuntu 하드용량 조절하기 기본 하드를 15GB 로 설정을 했다가 데이터가 부족하여 50GB 로 늘렸다(가상화) df 해보면 기존 15GB 만 잡혀 있다 이걸 윈도우 하드용량을 조절하듯이 손쉽게 가능하다. 우선 gparted 를 설치해주자. # apt-get install gparted 설치가 다 되면 # gparted 구동해주자 보면 추가된 34GB 용량이 보인다. sda3 에 마우스 오른쪽 버튼 눌러서 resize/move 눌러보자 하드를 늘려주고 resize 눌러주면 하드 용량이 늘어났다. 적용을 눌러주면 정상적으로 데이터 용량이 늘어난다.

Ubuntu 2023.10.27

# Error constructing proxy for org.gnome.Terminal:/org/gnome/Terminal/Factory0: Error calling StartServiceByName for org.gnom e.Terminal: Timeout was reached

# Error constructing proxy for org.gnome.Terminal:/org/gnome/Terminal/Factory0: Error calling StartServiceByName for org.gnom e.Terminal: Timeout was reached 위와 같이 에러가 발생을 한다면 # sudo gnome-terminal sudo 를 같이 입력을 해주면 정상 작동 된다. 아니면 # gnome-terminal --disable-factory or # dbus-launch gnome-terminal 위 옵션으로 열어주면 정상적으로 열린다.

Ubuntu 2023.04.23

libGL error: No matching fbConfigs or visuals foundlibGL error: failed to load driver: swrast

# gnome-terminal libGL error: No matching fbConfigs or visuals found libGL error: failed to load driver: swrast # Error constructing proxy for org.gnome.Terminal:/org/gnome/Terminal/Factory0: Error calling StartServiceByName for org.gnome.Terminal: Timeout was reached ubuntu 에 위와 같이 에러가 발생 한다면 # apt-get install libnvidia-gl-418 Reading package lists... Done Building dependency tree Reading state..

Ubuntu 2023.04.20

Updating from such a repository can't be done securely, and is therefore disabled by default.N: See apt-secure(8) manpage for repository creation and user configuration details.

# apt install libigdgmm-dev Reading package lists... Done Building dependency tree... Done Reading state information... Done The following NEW packages will be installed: libigdgmm-dev 0 upgraded, 1 newly installed, 0 to remove and 14 not upgraded. Need to get 108 kB of archives. After this operation, 948 kB of additional disk space will be used. Err:1 http://kr.archive.ubuntu.com/ubuntu hirsute..

Ubuntu 2022.10.19

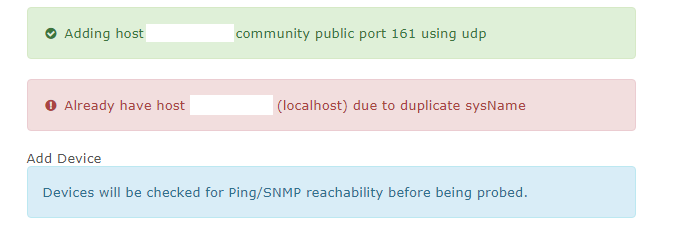
librenms Already have host (localhost) due to duplicate sysName

위와 같이 librenms 등록 할때 hostname 이 중복으로 잡혀서 등록이 안되는 경우가 있다. 이건 옵션에서 수정하면 된다. 글로벌 셋팅에 들어가면 $config['allow_duplicate_sysName'] = false;. 를 $config['allow_duplicate_sysName'] = true;. 로 변경해주면 된다. 웹상에서는 수정이 안되는듯 하다. 저번에 group 명 수정 한것 처럼 misc/config_definitions.json 에 들어가서 true 로 변경 하고 refresh 하면 수정 되어 있다. 정상적으로 장비가 등록 된다.

Ubuntu 2022.01.24

cacti install for ubuntu 20.04

이전에 centos 6.6 버전에서 cacti 설치 했었는데 설치가 쉬워졌다. ubuntu 로 설치 해본다 -- ubuntu 20.04 기준 -- # apt-get install cacti Reading package lists... Done Building dependency tree Reading state information... Done The following additional packages will be installed: apache2 apache2-bin apache2-data apache2-utils dbconfig-common dbconfig-mysql default-mysql-client default-mysql-server fonts-dejavu-extra fonts-fork-..

Ubuntu 2021.10.12

ACPI Error No handler or method for GPE error for ubuntu install

LG 그램 노트북에 ubuntu 설치 할때 위와 같이 에러 메세지가 나타난다. 설치 할때 install ubuntu 커서로 이동 후 키보드 E 를 누르면 편집이 가능하다. setparams 'Install Ubuntu' set gfxpayload=keep linux /casper/vmlinuz file=/cdrom/preseed/ubuntu.seed boot=casper only-ubiquity quiet splash --- initrd /casper/initrd 를 setparams 'Install Ubuntu' set gfxpayload=keep linux /casper/vmlinuz file=/cdrom/preseed/ubuntu.seed boot=casper only-ubiquity quiet s..

Ubuntu 2021.02.23

iredmail install for ubuntu 18.04

단일 메일서버다. 혼자쓰는 용도의 메일서버. git clone https://github.com/iredmail/iRedMail.git unzip iRedMail-master.zip cd iRedMail-master/ chmod 777 iRedMail.sh ./iRedMail.sh yes 선택 사서함 저장 경로 지정 하고 다음 nginx 서버 선택하고 다음 원하는 db 선택하고 다음 도메인 입력하고 다음 암호 입력후 다음 모두 선택 후 다음 모두 맞는지 확인 후 y 쭈루루룩~ 설치 되고 다시 y 눌러주면 설치가 완료 된다. /root/iRedMail-master/iRedMail.tips 파일은 삭제 해주자 중요정보가 들어가 있으니 백업을 하고 삭제 해주자. 다음 http://localhost 접속하면 위..

Ubuntu 2020.05.21
728x90
반응형